I’ve just returned from a trip to the Pacific Northwest. My intention on this trip was to shoot as much on film as possible. In recent years, I’ve found traveling with film is hard, especially if there’s air travel involved, and this seems to only encourage me to travel with as small a digital set up as possible. For someone who loves large format film, this is bad. So this road trip which took me from Western Montana through Idaho, Washington and Oregon was all about film, and mostly 4×5.
While in Portland, I stopped in at my favorite camera store, Blue Moon Camera and Machine, as I knew they had a decent selection of pinhole cameras, and I wanted to check them out. I ended up buying a used Ondu 4×5 (a Mark I, I believe). This camera has a .2mm pinhole and a relative focal length of 65mm, which renders an f-number of about f/217.
I carried this pretty little box around with me and found I was far more likely to use it than my (much) larger Toyo 4×5. This was in part due to the lighter, less cumbersome form, and also due to the less complicated –and more uncertain — process involved with taking a shot.
The Ondu, like most 4×5 pinhole cameras, is designed to take standard 4×5 film holders. This was very appealing as I already had a number of 4×5 film holders in my kit, and a good selection of 4×5 film stocks. Had this not been the case, I would certainly have opted to purchase the Zero Image 8×10 pinhole. I’m convinced I made the right choice both economically, and practically. (Mind you, I am going to get that beautiful Zero Image 8×10 someday, I swear!)
Let me say a few words about the process of shooting large format film in general and pinhole in particular: Large format is slow. It is supposed to be that way. Each exposure takes a significant amount of time to frame, focus and determine optimal exposure. The cameras are usually very capable of all sorts of movements which can at times be used to render greater or shallower depth of field, adjust convergence lines either to minimize or exaggerate, and generally give the photographer exceptional control over the scene they are rendering. In my experience, the possibilities with large format encourage thought, even when they don’t encourage application. That is, I will very often take the time to try different adjustments in setting up a shot only to realize that the adjustment is not needed. This experimentation takes time, and it is part of why large format is so valuable, and slow. It is a different process of visualization than other types of photography, not only a larger negative.
Pinhole is in many ways the complete opposite, even though it allows the use of large format film. Typical pinhole cameras have a fixed field of view determined by the distance from the shutter (e.g. pinhole) to the film plane, and a fixed f-stop, determined by the diameter of the pinhole. There are no movements of any sort, and in fact, there is no real way to view the image (as accomplished with the ground glass on a view camera). Certain smaller format pinhole cameras come with rangefinders to allow you to frame the scene, but large format ones generally do not. So, you just set them in front of your scene and go.
As with all film, there is no viewing the image until it is developed. In the case of my recent trip, this was not until I was home and in the darkroom.
There is an element of creative risk that I found enticing and thrilling with shooting pinhole. I would often set out with just my Ondu and a Gorillapod and a bag of 6 film holders. Sometimes this would result in 2 or 3 exposures, other times none. Often when I was getting ready to take a shot, I would consider that I was about to throw another sheet of film away. I had no idea if my exposures were close to accurate, how the 65mm field of view would render the subject or if my camera was even reasonably level to the subject. I knew virtually nothing, and so I had to take pleasure in my uncertainty.
In fact, I found the uncertainty completely liberating and creative.
Now that I’ve developed some of the images, I have to say, I am delighted. Not that every image is a masterpiece, or even worthy of being printed. Still, I think they are great.
Here is the first pinhole image I shot with the Ondu.
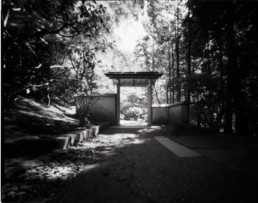
I can’t say this is the best photo I’ve ever taken, but I love how moody and contrasty it is. This was not a simple scene to meter. It was morning light on a very bright sunny day taken in a place of deep shade. I metered the exposure at f/217 at about 18 seconds which I compensated to 39 seconds for Delta 100 Pro’s reciprocity failure. I have reasonable confidence in my understanding of metering, and calculation for reciprocity, but I had no confidence that I was going to end up with a decent image. For that reason alone, I see this strange image as a total victory.
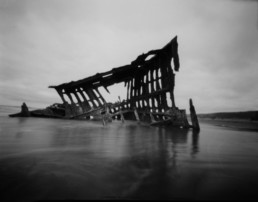
This shot of the Wreck of the Peter Iredale was taken with the Ondu 4×5 in early afternoon sunshine on the beach in Fort Stevens State Park near Warrenton, Oregon. It’s pretty straight forward; I just had to crouch in the surf for about 5 minutes while I set it up and exposed. As the wreck was right at the high mark of the waves, this did involve me taking a couple of waves and getting a wet arse. At the time, I was concerned that I had ruined the exposure and over-exposed, but I was again pleased with the result. Film is generally more forgiving than digital, and more so when you are making exposures of several seconds or longer. The reciprocity failure properties of most films adds great flexibility to pinhole photo exposure.
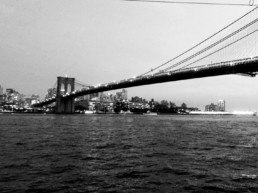
This image (which also appears at the top of this post), was taken shortly after I took a fall climbing down to the bank of the Columbia just outside of Astoria, OR. I was bloody and battered but determined to get the shot, so I set up the pinhole camera (I had originally planned on shooting this scene with my Toyo 4×5), and did a quick shot. I couldn’t be happier with the resulting image. I plan on printing this image with both platinum-palladium (Na2) and toned cyanotype. Stay tuned and I’ll post on the printing process and the result.